# Account Funding
Enabling customers to fund their account has never been easier with our payment methods API and embeddable UI components.
Everything in this section revolves around the payment methods concept.
Our embeddable UI components are built so you don't have to worry about PCI compliance. We take care of everything in a transparent and secure manner by leveraging strong and open internet security standards like signed JWTs and iframe.
# List payment methods
Saved cards will appear as payment methods that you can easily pull via the API. Depending on whether a payment method belongs to an individual or anonymous user (Guest), two API endpoints are available:
GET /individuals/:id/payment_methodsGET /guests/:id/payment_methods
Example payment methods listing request:
GET /v3/guests/9a792adc-f4a2-4089-8e53-f3b0c140fc12/payment_methods

Content-Type: application/json
Authorization: Bearer <access_token>
Response:
HTTP 200 OK

{
  "data": [
    {
      "id": "c405c5b0-bd49-4472-9b12-e36b04283358",
      "type": "card",
      "details": {
        "brand": "visa",
        "exp_month": "12",
        "exp_year": "25",
        "last4": "0337"
      },
      "created_at": "2021-07-27T10:39:14+02:00"
    }
  ],
  has_more: false,
}
# Create a payment method
This section describes the common set of steps needed in order to:
- Save a card as a payment method
- Accept a one-off card payment
- Delete a payment method
The flow begins on the backend by initiating a payment method consent to get a secret token. After that, the token needs to be passed to the front-end into Intergiro's 3D SDK to complete the process.
# Generate charge consent
Here one needs to decide whether there's the need to make a one-off charge or set up a recurring payment. If so, make sure to include charge details specifing the destination account ID the money should land to.
In cases where you only need to save the card, the charge section can be skipped.
POST /v3/individuals/b3c8b592-daff-45cc-95ba-1741a4105b23/payment_methods

Content-Type: application/json
Authorization: Bearer <access_token>

{
  "charge": {
    "amount": 1000,
    "currency": "EUR",
    "account_id": "34df9d62-8f66-4b78-b107-41dd3fb36e11"
  },
  "type": "card"
}
Response:
HTTP 412 Precondition Failed

{
  "consent": {
    "id": "e30b2da8-879d-4d9d-b9f9-7c461500245f",
    "status": "pending"
  }
}
Once the charge consent is created, it needs to be explicitly requested for it to be used in the next confirmation step.
Use the following API endpoint with the consent.id from the previous response:
POST /v3/consents/e30b2da8-879d-4d9d-b9f9-7c461500245f

Content-Type: application/json
Authorization: Bearer <access_token>
Response:
HTTP 200 OK

{
  "method": {
    "redirect_url": "https://3d.staging.intergiro.tech/...",
    "token": "YW55IGNhcm5hbCBwbGVhc3Vy",
    "expires_at": "2021-07-27T12:00:33+02:00"
  }
}
# Custom payment flow
To provide a seamless user experience we provide a way to embed Intergiro's custom UI components to your app.
TIP
Currently the components are web-based, but you can still use them on the mobile in a WebView.
# Step 1: Include 3D SDK
The first steps require adding the Intergiro 3D SDK library to your application.
<!DOCTYPE html>
<html>
<head>
  <meta charset="utf-8">
  <title>My checkout</title>
  <script src="https://3d-sdk.staging.intergiro.tech/v1/"></script>
</head>
<body>
    <script type="text/javascript">
    const intergiro = Intergiro3D('<public key>')

    fetch('https://your-domain.com/create-charge-consent', {
      method: "POST",
      headers: {
        "Content-Type": "application/json"
      },
      body: JSON.stringify({
        amount: 15
      })
    })
      .then(result => result.json())
      .then(({ token }) => {

      })
  </script>
</body>
</html>
WARNING
https://3d-sdk.staging.intergiro.tech/v1/ is the URL for the Staging environment.
https://3d-sdk.intergiro.com/v1/ is the URL for the Production environment.
TIP
https://your-domain.com/create-charge-consent is an example of an endpoint that should be implemented on your platform.
To make this work, you need to perform two actions using the Intergiro API:
- Start Creating Payment Method:
Send a
POSTrequest tov3/individuals/:individual_id/payment_methods. This action begins the process of creating a payment method. - Generate Consent:
Send a
POSTrequest to/v3/consents/:consent_id. In this request, you should include the Consent ID obtained from the previous step. This request will provide you with aredirect_urland atoken.
Make sure to use this token from the last request as the response when your custom endpoint is accessed.
# Step 2: Initialize UI components
<!DOCTYPE html>
<html>
<head>
  <meta charset="utf-8">
  <title>My checkout</title>
  <script src="https://3d-sdk.staging.intergiro.tech/v1/"></script>
</head>
<body>
  <form>
    <div id="card-input-container">
    </div>
    <button type="submit">Make payment</button>
  </form>
  <script type="text/javascript">
    const intergiro = Intergiro3D('<public key>')

    fetch('https://your-domain.com/create-charge-consent', {
      method: "POST",
      headers: {
        "Content-Type": "application/json"
      },
      body: JSON.stringify({
        amount: 15
      })
    })
      .then(result => result.json())
      .then(({ token }) => {
        const components = intergiro.components()     // initialize components library
        const card = components.get('card-input')     // create card input component
        const container = document.getElementById('card-input-container')
        card.mount(container)                         // mount card component onto the page

      })
  </script>
</body>
</html>
# Step 3: Confirm payment method
<!DOCTYPE html>
<html>
<head>
  <meta charset="utf-8">
  <title>My checkout</title>
  <script src="https://3d-sdk.staging.intergiro.tech/v1/"></script>
</head>
<body>
  <form>
    <div id="card-input-container">
    </div>
    <button type="submit">Make payment</button>
  </form>
    <script type="text/javascript">
    const intergiro = Intergiro3D('<public key>')

    fetch('https://your-domain.com/create-charge-consent', {
      method: "POST",
      headers: {
        "Content-Type": "application/json"
      },
      body: JSON.stringify({
        amount: 15
      })
    })
      .then(result => result.json())
      .then(({ token }) => {
        const components = intergiro.components()
        const card = components.get('card-input')
        const container = document.getElementById('card-input-container')
        card.mount(container)

        const button = document.getElementsByTagName('button')[0]
        button.onclick = function(e) {
          e.preventDefault()
          intergiro
            .confirmPaymentMethod(token, {
              payment_method: {
                card: card,
              }
            })
            .then(result => {
              if (result.error) {
                console.error(result.error)
              } else {
                console.log(result.data)
              }
            })
        }
      })
  </script>
</body>
</html>
# Save card as a payment method
You can give user the ability to save card for later use by specifying a save flag when confirming:
intergiro.confirmPaymentMethod(token, {
  payment_method: {
    card: card,
  },
  save: true,
})
.then(result => {
  if (result.error) {
    console.error(result.error)
  } else {
    console.log(result.data)
  }
})
This will make this card available in payment methods listing API.
TIP
Only one payment method can be saved for each individual or guest. If you wish to add another payment method, you must first delete the previous one.
TIP
Payment method ID can be retrieved by making a GET request to /individuals/:individual_id/payment_methods or /guests/:guest_id/payment_methods endpoint (see details in List payment methods section).
# Charge a payment method
To charge a payment method you need to know its ID. You can get it from the payment methods listing API. Then you can use it to charge the payment method for an individual:
POST /v3/individuals/b3c8b592-daff-45cc-95ba-1741a4105b23/payment_methods/c405c5b0-bd49-4472-9b12-e36b04283358/charge

Content-Type: application/json
Authorization: Bearer <access_token>

{
  "amount": 1000,
  "currency": "EUR",
  "account_id": "34df9d62-8f66-4b78-b107-41dd3fb36e11"
}
or for a guest:
POST /v3/guests/b3c8b592-daff-45cc-95ba-1741a4105b23/payment_methods/c405c5b0-bd49-4472-9b12-e36b04283358/charge

Content-Type: application/json
Authorization: Bearer <access_token>

{
  "amount": 1000,
  "currency": "EUR",
  "account_id": "34df9d62-8f66-4b78-b107-41dd3fb36e11"
}
API will return a consent required response that needs to be confirmed by the user before the payment method is charged.
HTTP 412 Precondition Failed

{
  "consent": {
    "id": "e30b2da8-879d-4d9d-b9f9-7c461500245f",
    "status": "pending"
  }
}
Use the following API endpoint with the consent.id from the previous response:
POST /v3/consents/e30b2da8-879d-4d9d-b9f9-7c461500245f

Content-Type: application/json
Authorization: Bearer <access_token>
Response:
HTTP 200 OK

{
  "method": {
    "redirect_url": "https://3d.staging.intergiro.tech/...",
    "token": "YW55IGNhcm5hbCBwbGVhc3Vy",
    "expires_at": "2021-07-27T12:00:33+02:00"
  }
}
Charging an existing payment method work similarly to creating a payment method as shown in the custom payment flow.
<!DOCTYPE html>
<html>
<head>
  <meta charset="utf-8">
  <title>My checkout</title>
  <script src="https://3d-sdk.staging.intergiro.tech/v1/"></script>
</head>
<body>
  <form>
    <div id="payment-update-container">
    </div>
    <button type="submit">Charge payment method</button>
  </form>
    <script type="text/javascript">
    const intergiro = Intergiro3D('<public key>')

    fetch('https://your-domain.com/create-charge-consent', {
      method: "POST",
      headers: {
        "Content-Type": "application/json"
      },
      body: JSON.stringify({
        amount: 15
      })
    })
      .then(result => result.json())
      .then(({ token }) => {
        const components = intergiro.components()
        const cvcInput = components.get('payment-update', { token })
        const container = document.getElementById('payment-update-container')
        cvcInput.mount(container)

        const button = document.getElementsByTagName('button')[0]
        button.onclick = function(e) {
          e.preventDefault()
          intergiro
            .chargePaymentMethod(token, { cvcInput })
            .then(result => {
              if (result.error) {
                console.error(result.error)
              } else {
                console.log(result.data)
              }
            })
        }
      })
  </script>
</body>
</html>
TIP
https://your-domain.com/create-charge-consent is an example of an endpoint that should be implemented on your platform.
The approach should be similar to the one described for the "Create a payment method" flow.
However, rather than sending a POST request to v3/individuals/:individual_id/payment_methods, you should send a POST request to v3/individuals/:individual_id/payment_methods/:payment_method_id/charge.
# Delete a payment method
In case the user wants to use a different card as their payment method, the previous payment method must first be deleted. In case of individual's payment method, the following endpoint can be used for this purpose:
DELETE /v3/individuals/b3c8b592-daff-45cc-95ba-1741a4105b23/payment_methods/c405c5b0-bd49-4472-9b12-e36b04283358

Content-Type: application/json
Authorization: Bearer <access_token>
In case of guest payment method, the following endpoint can be used:
DELETE /v3/guests/b3c8b592-daff-45cc-95ba-1741a4105b23/payment_methods/c405c5b0-bd49-4472-9b12-e36b04283358

Content-Type: application/json
Authorization: Bearer <access_token>
# Customization
# Prefill cardholder data
You can pass the ephemeral token within the options object to prefill the Cardholder Name and Cardholder Email fields with individual's data, making them non-editable.
Example:
const options = {
  token: 'eyJjbGFpbXMi...',
}

components.get('card-input', options)
# Setting the widget Language
To set the widget's language, include a language parameter in the options object. Use a valid ISO 639-1 language code for this parameter.
If no language is specified, the widget will first attempt to use the value of the lang attribute from the html tag. If the lang attribute is not set, it will default to the browser's language (navigator.language). If the specified or detected language is unsupported, the widget will default to English.
Example:
const options = {
  language: 'de',
}

components.get('card-input', options)
Supported languages:
- English:
en - German:
de - Italian:
it - Serbian:
sr - Croatian:
hr - Bulgarian:
bg - Romanian:
ro - Polish:
pl - Turkish:
tr - Greek:
el - Swedish:
sv
# Customize styles
3D SDK elements can be customized to better match your brand.
const options = {
  layout: 'standard',
  fontImport: 'Roboto:wght@300',
  style: {
    gap: '0.5rem',
    fontFamily: 'Roboto',
    fontWeight: '300',
    text: {
      background: '##e1e4e8',
      color: 'black',
    },
    border: {
      color: '#ccc',
      width: '1px',
      radius: '0',
    },
  },
}

const card = components.get('card-input', options)
# Styled "card-input" example:
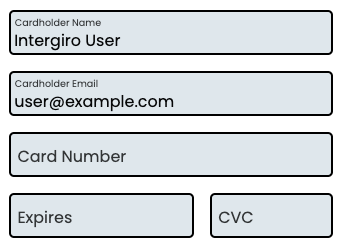
# Supported options
| Property | Type | Description |
|---|---|---|
layout | string | Layout type. Possible values: row, column, standard |
fontImport | string | Google font |
style.text.background | css color | Text background color |
style.text.color | css color | Text color |
style.border.color | css color | Border color |
style.border.width | css distance in px or relative units | Border width |
style.border.style | css border-style, ex. solid | Border style |
style.border.radius | css border-radius in px, ex. 25px | Border radius |
style.fontFamily | string | Font family |
style.dangerColor | css color | Danger color |
style.gap | css distance in px or relative units | Gap width |
style.background | css color | Background color |
token | string | Prefills "Cardholder Name" and "Cardholder Email" with individual data |
language | string | Card widget language. Possible values: en, de, it, sr, hr, bg, ro, pl, tr, el, sv |
* all properties are optional
← Payments Introduction →